What are permissions?
Permissions are specific rights or privileges assigned to actions within the MonstarPeople system. Each permission allows a user to perform a particular operation, such as adding employees, updating profiles, or exporting reports. Permissions ensure that users only have access to the functionalities necessary for their job tasks. Administrators can access, edit and modify permissions.
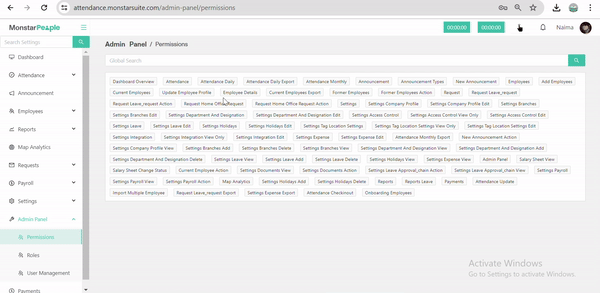
You can choose and set several types of limitations and permissions from a list of 72 HR functionalities for your employees. You can view the list of permissions from the Admin Panel located at the left sidebar in the dashboard.
If you are logged in to your MonstarPeople account, you can access and modify within the system directly by navigating to admin panel and then permissions.
If you are not logged in the system, you can view the list of 72 permissions in MonstarPeople by scrolling down to the bottom of this page.
A role is a collection of permissions grouped together under a single label to define the access level of a user or a group of users. Roles simplify the management of user permissions by allowing administrators to assign multiple permissions simultaneously through roles. For example, an “Admin” role might include a wide range of permissions for system management tasks, whereas a “User” role might have more limited access.
Rules allow administrators to control, edit and modify who can see and do what, thereby enhancing security and operational efficiency.
MonstarPeople gives admins the ability to add as many roles as they want and set permissions accordingly. Admins can add roles and permissions from the admin panel. Here’s how:
Simply click the Roles button from the admin panel dropdown at the left sidebar. This will open the Admin Panel / Roles dashboard.
Click the Add Role button from the left and this will open a small box where you need to type in the name of the role.
Type the role name and click ADD. This will add a new role in MonstarPeople.
You can set and edit specific permissions from the admin panel. Here’s how:
Select role: Click the Roles button from the Admin Panel dropdown located at the left. This will take you to the roles dashboard (the navigation for this is admin panel > roles).
Select edit: Click the pencil icon in the row of the role that you want to edit. This will open the Edit Permissions dashboard from where you can edit and set permissions.
Edit Permissions: Choose the permissions that you want to give to the role and click the Save button.
Now that you know how to edit permissions for each role, it is time to learn how to assign roles to users. Administrators can assign roles from the admin panel. Here’s how:
Click the User Management button from the Admin Panel dropdown menu located at the left sidebar.
Select employee or type the name of the user from the search bar.
Click the Assign Role icon and this will open a box from where you choose the role name that you want to assign.
Click the Save button.
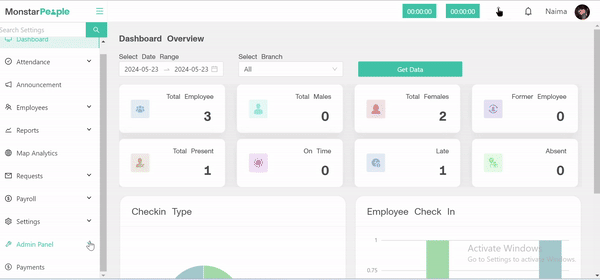
Check-in types are categories used to track employee location and record employee attendance within your organization. These check-in types help differentiate between where and how your employees are working. MonstarPeople comes with 4 predefined checkin types and these can also be customized.
Assigning check-in types help HR and administrators with the following areas:
Location-Based Tracking of Employees: MonstarPeople uses GPS location tracking and helps admins and HR managers determine and verify the geographic location of the employees when they check in.
Geo-Fencing: With the help of the geo-fencing technology enabled by MonstarPeople Attendance system and by assigning the “In-Office” check-in functionality to users, you can set up location boundaries around specific locations such as your office or a designated work site. When you enable this feature, employees can only check in for attendance within these predefined areas, enhancing compliance with workplace policies. This option can also be enforced by specific networks like your company’s Wi-Fi.
Tracking Attendance: This involves systematically recording the times when employees check in and out, providing you and your team data that can be used for resource planning. payroll and monitoring compliance with work schedules.
Thus, by assigning the check-in types you can manage diverse working arrangements efficiently.
Administrators can edit checking types from settings.
Navigation: Settings > Access Control > Manage Checking Types
You can edit the checking type by clicking on the checking parameters. Click Update Checking Type after editing.
URL: https://attendance.monstarsuite.com/settings/access-control
Here is the list of 72 actions an areas an administrator can access and modify within the MonstarPeople application
Dashboard Overview
Attendance
Attendance Daily
Attendance Daily Export
Attendance Monthly
Announcement
Announcement Types
New Announcement
Employees
Add Employees
Current Employees
Update Employee Profile
Employee Details
Current Employees Export
Former Employees
Former Employees Action
Request
Request Leave_request
Request Home Office Request
Request Home Office Request Action
Settings
Settings Company Profile
Settings Company Profile Edit
Settings Branches
Settings Branches Edit
Settings Department And Designation
Settings Department And Designation Edit
Settings Access Control
Settings Access Control View Only
Settings Access Control Edit
Settings Leave
Settings Leave Edit
Settings Holidays
Settings Holidays Edit
Settings Tag Location Settings
Settings Tag Location Settings Edit
Settings Integration
Settings Integration Edit
Settings Integration View Only
Settings Expense
Settings Expense Edit
Attendance Monthly Export
New Announcement Action
Settings Company Profile View
Settings Branches Add
Settings Branches Delete
Settings Department And Designation View
Settings Department And Designation Add
Settings Department And Designation Delete
Settings Leave View
Settings Leave Add
Settings Leave Delete
Settings Holidays View
Settings Expense View
Admin Panel
Settings Leave Approval_chain Action
Settings Leave Approval_chain View
Settings Payroll
Settings Payroll View
Settings Payroll Action
Map Analytics
Settings Holidays Add
Settings Holidays Delete
Reports
Reports Leave
Payments
Attendance Update
Import Multiple Employee
Request Leave_request Export
Settings Expense Export
Attendance Checkout
Onboarding Employees